Monday, October 29, 2007

My denim flower !!!

This is my first denim project, I got inspired by this tutorial, and came up with the second pic. You just rip off a strip of ur old denim jeans depending on the width of the flower u want ! Use a needle/string to sew the center of the flower, the longer the strip, the fluffier the flower !

That was my first test, I think the next time I will use a longer strip to make the flower more dense...
You can then use an old button and sew it to the center of the flower !

The flower can be used as hair ornament, bag, necklace, hair pin, brooch...

Personally, I will use it as a door knob for our new-handmade-totally-completely-designed-and-made-by-me-and-my-husband closet !!! Will post pics of it later


Enjoy the project, and don't forget to post ur pics to the comments when u do ur own version !!!

Friday, October 26, 2007

Light garland - Guirlande de lumiere

2 weeks ago, while I as looking at one of the book stores to get my dad a retirement gift, I found a craft book about garland... in french it's called "guirlande lumineuses" or "guirlandes de lumiere". I couldn't get to translate it properly, so i made my seraches on the french topic, and here's what I got... I've been longing to do that project, and was looking for inspiration...and now is the time to do the serach... I hope somehow someone can direct me to a turorial for those interesting projects, and if I can get a a copy of the book, I'll post some of the projects, which are very interesting.

Her are some of the ideas that can be done :


I think this one is a bit diffcult since I have to reproduce the pattern on a piece of papaer and cut it..it's gona take a lot of time to be finalised ! Yet I ma still not sure which paper I should use for this project :

This one is very easy, I guess... I'll just bring the organza fabric which is very cheap too, and cut long strips of it and do as illustarted in the jeans flower example :

This one is also easy and cheap to do, however I guess the difficult part would be the border and how to make it look neat, because when cut, this kind of fabric is not solid.

The feather's type is the easiest ever !!! and cutest for a girls room :

This project can also be done with the organza fabric. Cut a wide strip of the organza, fold in half and gather it randomly around the cord.

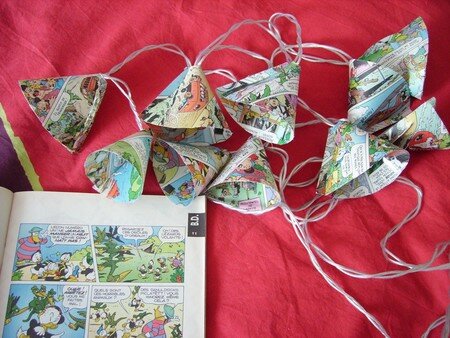
A tutorial I got from someone using the comic book to create a light garland ! very neat !


Another tutorial I found for paper based light garland, in this exmaple u can use any paper u like to make the garland :


Here's a tutorial also in French that I found on the french carft website :

Another project I found with terra cotta pots !!!

Tuesday, October 23, 2007

Home DIYs !


Homemade Glass and Window Cleaners
Ingredients:

1 part vinegar
1 part alcohol
1 part water

Directions:

Combine in a spray bottle. This can be used on windows, mirrors, appliances, faucets, etc. I find that it works better (read: less streaking) than store bought.


Homemade Holiday Air Fresheners

Holiday Spice
Apple Cinnamon
1 cinnamon stick
1 apple cut into fourths
Bring ingredients to a boil and simmer. If liquid gets too low, add more water.

Citrus Cinnamon
1 cinnamon stick
1 orange sliced into fourths
Bring ingredients to a boil and simmer. If liquid gets too low, add more water.

Monday, October 22, 2007

My Tech.Box

I always keep our old mobile phones, headsets, batteries, catalogs, cables, Driver CDs, USB cables, etc... coz I usually use them one day...However, it is always the case, when i do need them, I can't find them, or I find the one item that I don't need this time...
I realised actually that the problem is that I keep moving them from drawer to drawer, from box to box, and they're not gathered in one specific spot...
Moreover, I have many boxes, each with its own device...
So I finally decided to gather them all in 1 box, saving space, time and stress !!!

I chose the biggest of the boxes, and of course threw away all the rest...
I covered it with papers from one of the catalogs that had to be thrown away since it's in Japanese, and I don't know yet how to read Japanese...
I glued the ripped Japanese papers all over the box... I guess there were 4 or 5 layers of ripped papers...no pattern, no order, just overlaying them !!!

Then I used a pen to punch 2 wholes in the box, Brought old satin ribbons , knotted them at one side and entered in the holes, then added to the other sides of the ribbons 2 wooden beads...and Voila...
My tech.-archive-box is here !!!


Now that I look at it... I think it needs more embellishement... will probably add some glittery parts, or collage letters from old magazines...

Friday, October 19, 2007

Beautiful readings !!!

The following are readings I found while I was looking for texts and reading for my wedding, eventually I didn't include them in my wedding, since they are in English and I felt the'll loose their charm if I translate them ... So I just hope to use them for a wedding gift for my sister !!!
I really adore the blessing said here ...read and enjoy !!!

TRADITIONAL IRISH BLESSING

May the road rise to meet you
May the wind be always at your back.
May the sun shine warm upon your face,
the rains fall soft upon your fields.

May the light of friendship guide your paths together.
May the laughter of children grace the halls of your home.
May the joy of living for one another trip a smile from your lips,
a twinkle from your eye.

And when eternity beckons,
at the end of a life heaped high with love,
may the good lord embrace you
the whole length of your joy-filled days.

May the gracious god hold you both
in the palms of his hands.
And, today, may the spirit of love
find a dwelling place in your hearts.

May the road rise to meet you,
May the wind be always at your back.
May the sun shine warm upon your face,
The rains fall soft upon your fields.

And until we meet again,
May God hold you in the palm of his hand.

May God be with you and bless you;
May you see your children's children.
May you be poor in misfortune,Rich in blessings,
May you know nothing but happiness
From this day forward.

May the road rise to meet you
May the wind be always at your back
May the warm rays of sun fall upon your home
And may the hand of a friend always be near.

May green be the grass you walk on,
May blue be the skies above you,
May pure be the joys that surround you,
May true be the hearts that love you.

``````````````````````````````

APACHE MARRIAGE BLESSING

Now you will feel no rain,
for each of you will be the shelter for each other.
Now you will feel no cold,
for each of you will be the warmth for the other.
Now you are two persons,
but there is only one life before.
Go now to your dwelling place
to enter into the days of your life together.
And may your days be good and long upon the earth.

Treat yourselves and each other with respect,
and remind yourselves often of what brought you together.
Give the highest priority to the tenderness,
gentleness and kindness that your connection deserves.
When frustration, difficulty and fear assail your relationship
- as they threaten all relationships at one time or another -
remember to focus on what is right between you,
not only the part which seems wrong.
In this way, you can ride out the storms
when clouds hide the face of the sun in your lives
- remembering that even if you lose sight of it for a moment,
the sun is still there.
And if each of you takes responsibility for the quality of your life together,
it will be marked by abundance and delight.

Napkin for kids parties/showers

Here's a very fun project for all ur kids parties, showers, birthday, etc...

It's cheap, creative, customisable and upgradable...
- Cheap beacuse you only need paper napkins...
- Creative because u can come up woth any shape u want, shirt, pants, dress, t-shirt, etc...
- Customisable because u get to choose the colour, design, and shape u want that matches ur party (i.e. I did these to match a clown theme, for my friends shower (jungle theme) we did a kaki safari suit, we used the same tutorial below, but folded the sleeves and the pants to make it look like a safari suit, for a beach theme, u can also make a sailor suit !!!)
- Upgradable because u can add to it any items u like, buttons, ribbons, felt... name tags, belt ribbons, etc...

Below I will try to show how to make them... Please bare with me, and for additional information, please email me...I will be more than happy to help.

A) u may use the small or larger size of any square napkin :

B) Start by folding each side of the napkin in the middle, and make sure to fold in the direction shown on the following pic:
Side 1 :
Side 2 :
C) You should have this shape :
Now open the napkin in the center where the red arrows are pointed (don't let the thumb direction mislead u-just open it at the center).
U should have the following shape :


D) Now again fold the centers of each side :

until u get the following final shape :


E) Now remove one of the folded layers which will make the sleeves :


Now there are 2 types, if u wish to make a full dress, just cut a horizontal line shown as a blue dotted line in the pic below:

If u wish to make a shirt and a pant, cut 2 horizontal lines, one at the blue dotted level (for the shirt sleeves) and one at the red dashed line (for the pants):

In both cases, once u cut the horizontal lines, fold back the layers underneath as shown in pic below:


Now u will need a sticky glue, just to glue the folded sides on the back, u will figure out which sides need to be glued there's no rule, I usually glue the back of the shirt and dress, and sometimes I glue the inside of the shirt so it doesn't flip-flop when picked up by the guests.
example: glue this part :


Dress :

Shirt :

For the pants, once u cut the horizontal line (dashed in red), also cut a vertical line (shown as a dashed red line), and fold back the layers underneath (as shown in pics above):
then u'll have 2 leg of pants, fold the cut sides inside, and glue each leg, then glue both legs on top if each others :

Eh voila :


You can also cut diffrerent shapes of sleeves or legs :

In all cases, after I glue the "flippy" sides, I usually iron the "outfit" to have the folds smoothed.

Don't forget if u like what u see, and u decide to make ur own version, please post pics to my post comments,

Enjoy it !!!

Thursday, October 18, 2007

Crochet

Here is one of the nice articles I had saved earlier, and which I will post (as per the previous post):

15 Creative Ways To Use Crocheted Motifs

1. Attach motifs together to form curtains, scarves, pillows, bedspreads, tablecloths and table placemats.

2. Make a satin pillow the same size as motif, fill with potpourri, sew motif onto pillow for a nice decorative scented pillow that can be used to scent closets, drawers and cabinets.Purchase a journal or small notebook, cover in attractive cloth and sew a motif on the cover to make a wonderful gift.

3. Frame a motif for an attractive wall hanging.

4. Laminate a motif and glue cork to the back to make attractive coasters.

5. Attach a magnet on the back for attractive décor for your fridge.

6. Embed a motif made of sewing thread into a bar of soap for attractive bathroom décor that will amaze your guests. Instructions for embedding in soap can be obtained through the free "Scents And Beauty Business Course" at http://www.lyciall.com/beautycourse.htm

7. Sew a muslin bag the same size as motif, leaving one end open. Attach a motif to front and back of bag, attach Velcro for a closure and crochet a nice handle to make a sweet purse that any little girl will love.

8. Sew a motif onto the back pockets of jeans for a decorative touch that will always be in style. Add extra flair by sewing several motifs around the bottom of the jeans legs as well.

9. Glue 2 used CD’s together using rubber cement, with the shiny sides facing out. Glue a motif on each side, thread ribbon through the CD hole and hang in your car or by your window for an attractive sun catcher.

10. Dip a motif lightly in scented wax, lay it on waxed paper to dry, hang anywhere you’d like a freshening scent.

11. Cover an empty can with wallpaper, or attractive cloth, glue a motif onto the can for a decorative pencil holder.


As usual, if you're inspired and would like to make one of these crafts, kindly post the pics back to my blog post comments.

Enjoy !!!

Blogspot lifetime

OK so I will try to include here, everything I had gathered from here and there, and whenever I have time, I'll try to post articles or projects I had stored on my laptop. I think it hepls me get back extra space on my PC, however are we sure things posted here are not erased? are they really really very well protected? Do you really think I should delete them from anywhere else ?

I hope the Blogger doesn't have to shut down 0ne day, or just close up or anything like that. I already had a bad experince with the "ultimate wedding" website/chat section, it was an awesome community I joined, and which was afterwards closed !!! I had saved there, everything I looked up for weddings !!! beautiful pics, and projects and crafts... and suddenly it has shut down and I lost it all... Hope Blogger doesn't get the same problem...

So is there anywhere to save these posts ???
Please anyone reading my blogs, answer this !

A layout I just scrapped for Wakuri !


Umm...So I just wanted to make a thank u certificate for Wakuri, and I scrapped this layout... In fact, it's an easy one, since I already got the paper template from Tia Bennett Kit at 2peas... I just looked for the Bookplate from my old kits (I really can't rememebr who's kit it is)... And I looked up Wakuri blogspots, and found the pic... Wakuri, if u send me a pic of urs, I can replace it in the scrapbook !!!

Again thank u !!! hope u like it !


Bookmark this day :)

Browsing other people's blogs, appreciating their work and reading comments that follow each post, really was the booster to create a blog of my own.... I was always not-so-well-accepting the fact that I post verything I do on the internet !!! But then I looked at other poeple, much more talented than me, much more productive than me, and here they are sharing everything... so I thought well, I should do it... I might help someone, somehow, just like billions others have helped me while I was browsing their blogs... The worst thing about me, is I forget the source, never rememebr to save it and give people credit, but I will start doing it , I promise ...

So anyways, the reason why I am saying this, is that because today is one of the most important days in my blog's lifetime :) ... coz my blog has had his first "fan" :)

Someone has linked to my blogspot...someone liked my work ... someone appreaciated my posts :) Hourrrrrrrrrrrrayyyy I am really proud of u bloggie !!!

To Wakuri, thank you for the interest you gave to my blog... I hope u always find somethign intersting for u in my blog...

I know it's still in its very early primitive stage... it doesn't look anything like ur nice charming blog... but i am working on it ...

As soon as I figure out how to put that thing with the links to other blogs... I'll link to ur blog :) So how do we do it ? :)


Wakuri, Arigato gozaimashita, thank you very much !!!

(Thank you --> どうもありがとう。 Dōmo arigatō. )